


The Art of Layering Jewellery: A Modern Woman’s Guide to Wearing More with Intention
There’s a version of layering jewellery that looks like you emptied your jewellery box and hoped for the best. Chains tangled, rings on every finger, earrings competing with a necklace for the same square inch of attention. It’s a lot — and not in the good way.
And then there’s the other version. The one where everything seems effortless, intentional, alive. Where three necklaces at different lengths feel like one considered thought. Where stacked rings tell a story instead of creating noise. Where you walk in and someone says, quietly, “your jewellery is incredible” — and means all of it, together.
That second version isn’t luck. It’s a skill. And like most skills worth having, it has a few principles underneath it.
Here’s everything you need to layer jewellery the way it’s meant to be done.
First: What Intentional Layering Actually Means
Intentional layering is not about wearing more. It’s about wearing together.
The difference is significant. Wearing more is accumulation — adding pieces until the look feels full. Wearing together is curation — choosing pieces that create a conversation with each other, where each one is better for the presence of the others.
Think of it like composing a sentence. Every word pulls its weight. Nothing is there by accident. And the meaning that emerges is richer than any single word could carry alone.
That’s what a well-layered jewellery look does. It creates a whole that’s more expressive than its parts. The goal isn’t maximalism — it’s coherence with depth.
The Anchor Piece: Where Every Great Look Begins
Before you layer anything, find your anchor.
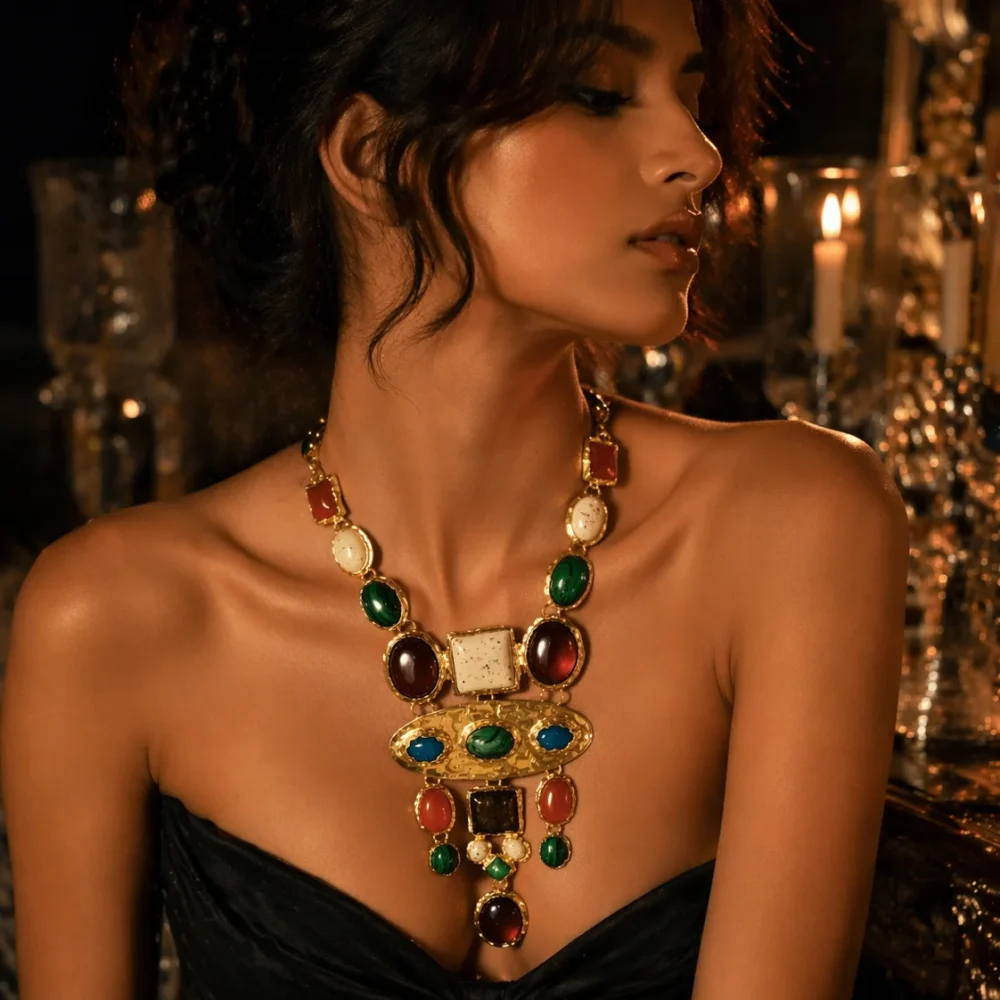
The anchor piece is the one that leads — the piece with the most visual presence, the strongest statement, or the most personal significance. Everything else you add should support it, not compete with it.
Your anchor might be a bold pendant that falls at the chest. A wide cuff with texture and weight. A statement earring with scale. A ring with an unusual silhouette. Whatever it is, it sets the tone for the rest of the look.
Once you’ve chosen your anchor, ask yourself: what does this piece need around it? Does it need something softer at a different length to balance it? Does it need negative space — a bare wrist, a single delicate chain — to let it breathe? Or does it invite more, in a complementary register?
The anchor answers all of those questions. Follow its lead.
At Bhinn, our most-layered pieces tend to be our [hero collection pieces — link to collection] — designed with enough presence to anchor and enough restraint to share the frame.
Layering Necklaces: The Length Rule (and When to Break It)
Necklaces are where most people start with layering, and where most layering mistakes happen. The fix is almost always the same: vary your lengths more dramatically than feels comfortable.
The three-length framework is your foundation:
- Choker or collar length (30–40 cm): Sits at or just above the collarbone. Creates structure and draws the eye upward.
- Princess length (45–50 cm): The most versatile length — sits at the chest and works with most necklines.
- Matinee or longer (60 cm+): Falls below the bust and creates depth and visual elongation.
When these three lengths are worn together, they create a cascading effect that reads as deliberate and sophisticated. The key is that each chain should be clearly distinct in length — if two necklaces are sitting at similar heights, they’ll tangle and compete rather than layer.
On mixing metals: The old rule — never mix gold and silver — is outdated. Mixed metals, done well, look considered and modern. The trick is to commit to the mix rather than letting it happen accidentally. Choose one metal as dominant and let the other appear as an accent. Or go for an intentional 50/50 split with pieces that have similar visual weight.
On mixing textures: This is where layering becomes genuinely interesting. A delicate fine chain next to a chunkier link chain next to a chain with a pendant creates textural contrast that makes each piece more visible and more interesting. Avoid layering three pieces of identical chain style — similarity at the same length creates blur, not depth.
Neckline matters more than most people realise. Deep V-necklines invite longer chains and pendants — they frame beautifully. High necklines work best with choker-length pieces or nothing at all. A wide scoop neck is one of the best canvases for layering — it gives your necklaces the space to be seen clearly.
Stacking Rings: From Knuckle to Base
Ring stacking has its own language — and once you learn it, your hands will never look the same way again.
Start with one statement ring — usually on the ring or index finger — and build outward from there. Thin bands, midi rings, and textured stackers are your supporting cast.
A few principles that make ring stacking work:
Odd numbers tend to look better than even. Three rings on one hand, or five spread across both, has a natural visual balance that two or four often lack. This isn’t a rule — it’s a tendency. Trust your eye.
Don’t stack only on one hand. Spreading rings across both hands creates balance and makes each individual piece more visible. A heavily stacked right hand paired with a single deliberate ring on the left is often more striking than crowding everything onto one side.
Mix band widths. A chunky band next to a hair-thin stacker next to a mid-weight band creates rhythm and visual interest. Stacking five identical thin bands can look beautiful in its own right — but it reads as one statement, not five. Know which effect you’re going for.
Leave deliberate gaps. An empty finger between stacked rings isn’t a mistake — it’s breathing room. It lets each piece be seen individually while still reading as part of a set.
Earrings and Necklaces: Making Them Work Together
The most common layering mistake at the neck and ear? Two things competing for the same space at the same volume.
The principle here is simple: one leads, the other follows.
If you’re wearing statement earrings — long, bold, or with significant presence — your necklaces should recede. A single delicate chain, or no necklace at all, lets the earrings carry the look. Adding a layered necklace situation on top of statement earrings creates a frame that’s too full and each element loses its impact.
Conversely, if your necklaces are the centrepiece — multiple chains, a bold pendant, textural layering — keep your earrings simple. Small studs, simple hoops, or a single understated drop create a clean upper frame that lets the neckline do its work.
The exception — the one that requires the most confidence and the most practice — is when both the earrings and the necklace are bold but tonally cohesive. This works when they’re clearly in conversation: same metal, complementary motifs, or a deliberate contrast (very structured earrings with very organic necklaces, for instance) that reads as intentional rather than accidental.
Day to Night: Transitioning Your Layers
One of the great strengths of a well-built layered look is its flexibility. With small adjustments, the same pieces can move from a workday to an evening out.
For daytime: Keep the layers quieter. Two necklaces instead of three. Rings on one hand rather than both. The anchor piece present but paired with more restraint. This gives your look presence without demanding attention in a context where subtlety serves you better.
For evening: Add the third necklace. Stack the second hand. Swap the small studs for a more considered earring. The same anchor piece that felt appropriate in the morning now leads a more expressive ensemble — because the pieces around it have shifted to support something more.
The transition takes under two minutes and changes the register of the entire look. That’s the efficiency of building around an anchor.
Common Layering Mistakes — and the Easy Fixes
Everything at the same length. Fix: Space your necklaces at least 5 cm apart in length. When in doubt, go further.
Mixing too many competing statement pieces. Fix: Choose one anchor. Let everything else support it rather than challenge it.
Ignoring the neckline. Fix: Before you layer, look at what you’re wearing. Let the neckline guide which lengths and silhouettes you reach for.
Stacking rings of identical width. Fix: Vary your band widths — at least one thicker piece, at least one delicate one.
Layering pieces that have nothing to say to each other. Fix: Find a thread — one shared metal, one common motif, or a deliberate contrast — and pull everything toward it.
Quick Reference: Layering at a Glance
| Element | The Principle |
| Necklace lengths | Minimum 5 cm between each layer |
| Metal mixing | Commit to the mix — dominant + accent |
| Anchor piece | Always lead with one — everything else supports |
| Ring stacking | Vary widths; odd numbers; spread across both hands |
| Earrings + necklaces | One leads, one follows |
| Daytime look | Quieter layers around the same anchor |
| Evening look | Add pieces gradually; deepen the register |
The Last Thing
Layering jewellery well is, at its core, about learning to listen to your pieces. What does this anchor need? What does this necklace want beside it? What does this ring gain — or lose — when it’s not alone?
Once you start asking those questions, the right combinations start becoming obvious. And the wrong ones stop happening, not because you’re following rules, but because you’ve developed something better — instinct.
Start with one anchor. Build slowly. Trust the spaces as much as the pieces.


